
Table of contents
Introduction
What is Magisk Root?
Magisk is based on phh superuser (An open source root project), developed by Topjohnwu. It is a systemless root which does not modify the system partition. It is mostly the same as the Xposed framework which has powerful tweaks.
Magisk manager has many built-in features i.e. MagiskHide, SafeNet, Busybox, Superuser, Logs, Systemless hosts, etc. And so It is considered as one of the best alternatives to Supersu and Kingroot because it helps you to install banking apps, pokemon go, official OTA updates without losing the root privileges, snapchat, and much more.
How to install Magisk with TWRP custom recovery
There are many ways to install Magisk on your android device. But rooting with TWRP recovery is considered as one of the best ways to install magisk on a device. Here, you no need to remove the old binary files or reset internal settings of your device.
You just have to flash your Magisk with the TWRP custom recovery. And it is one of the safest and cleanest way to install SU binary without modifying the system files.
Note: Before jumping into the following procedure, you must have to ensure that you have installed TWRP recovery on your device. If you did not installed then click here to read the complete guide on “how to install TWRP recovery on any android device.“.
Prerequisites:
- Android 5+ Version
- Custom Recovery (TWRP)
- Latest Magisk Zip file – download
Step by step guide
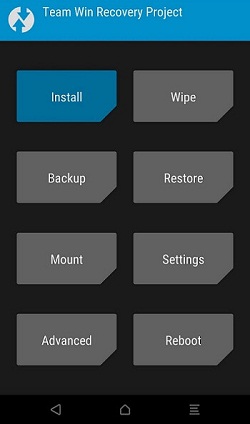
- First of all which you need to do is that boot your phone into the recovery mode. And then tap the install button in the TWRP menu (dashboard).
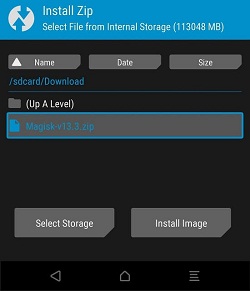
- And now, you have to navigate to your device’s download location or the where you have kept Magisk zip file.
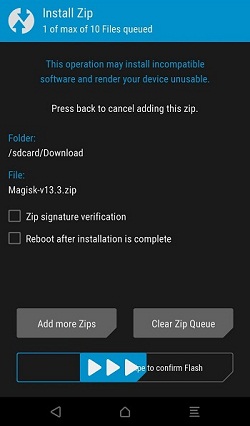
- And then swipe the slider (located at the bottom of the screen) to install the Magisk.
- And now tap “Reboot system“.
- That’s it. You have successfully flashed Magisk root on your device.
How to install Magisk with ADB and Fastboot (without custom recovery)
TWRP recovery is the best custom recovery solution for any android device as it comes with a user-friendly UI. You can easily install OTA updates, create/restore backup files, format partitions, etc.
There might be some reasons that you do not want to install Custom recovery on your device. Or your device does not support TWRP recovery Or the custom recovery image is not built yet for your device.
In this case, You can install magisk using ADB and fastboot method (Patching Stock Boot Image) which does not require a custom recovery. Follow the below tutorial to install Magisk without custom recovery by using ADB and fastboot.
Step by step guide:
- The very first thing which you need to do is that download ‘Stock boot image‘ for your current firmware installed on your device. Then you need to place the downloaded stock boot image in your device’s internal storage.
- And then download ‘Magisk Manager APK‘ (click here) and install in your device.
- Now launch/open Magisk manager on your android and then tap on “Install” option and then select “Install again“. And then you need to select ‘Patch Boot Image File‘. See below screenshot
- Now you will be automatically navigated to your device’s internal storage. Here you need to select the ‘Stock boot image‘ file which you have downloaded at the first step of this guide.
- Now you need to wait until the Magisk patch the boot image into your device. You will see something like below picture
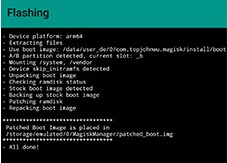
- Once the patch gets completed. You will get a ‘patched_boot.img’ file. Then you have to copy and paste the ‘patched_boot.img‘ file from your ‘/sdcard/MagiskManager/‘ location to your computer’s ‘C:\adb‘ location.
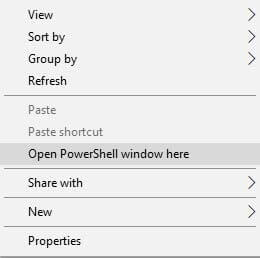
- In the same folder (i.e. C:\adb) you have to hold the ‘Shift key‘ and then right click on the empty space. And then select “Open PowerShell window here“.
- Now you have to boot your Android device into the fastboot/bootloader mode. (You need to press volume key + power button to get the bootloader mode. Your device may have other methods to get into the fastboot mode. Just make a Google search for it.)
- Now you need to connect your device to the PC.
- Now enter the below ADB command and hit enter. It will flash ‘patched_boot.img’ file to your device.
fastboot flash boot patched_boot.img
- Once flash gets completed. Reboot your device with the following ADB command.
fastboot reboot
- That’s it. You have successfully installed Magisk on your Android using ADB fastboot method without the custom recovery.
How to Bypass Google SafetyNet with Magisk
Traditionally, the devices rooted with supersu and kingroot used to use root cloak (and other root hiding apps).
But you have installed magisk manager, you can now hide root from those apps which do not work on the rooted devices. It not only helps you to bypass Google safetyNet but you can also use Android pay, Pokemon go.
So here in this guide, I am going to guide you on, ‘How you can bypass google safety net and use Android pay, Pokemon go and banking apps’
Step by step guide:
- Open Magisk manager.
- And then enable the following settings,
- ENABLE BUSYBOX
- ENABLE MAGISK HIDE
- ENABLE SYSTEMLESS HOSTS
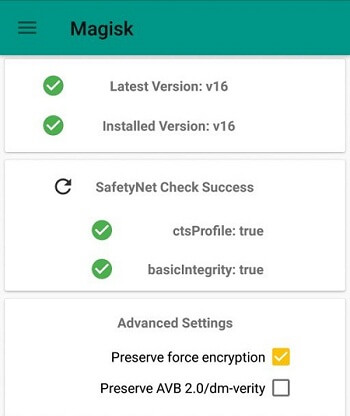
- That’s it.
Have you seen?
How it is easy to bypass root detection.
This is only due to the Magisk manager. Now you no need to use any root cloaking app for bypassing SafetyNet.
Thanks, I hope that the above step by guide helped you to install Magisk root on your Android device.
If you are unable to install the Magisk manager or you are getting any error like ‘Installation error 1’, then you can read this complete guide for how to fix installation error 1.
Do a comment in the below comment box. I love to hear you.
Hi, I’m looking for help because I have rooted my galaxy s5, and I used Safestrap twrp reovery and when I try and flash twrp to my phone Odin instanlty non responds. And I tried using the ABD anf FastBoot but I get confused on step 3 because I downloaded the apk from my phone and installed it, but when I open the magisk app the picture in the post isn’t the same. I was wondering if anyone could help I’ve been on all this for ab 2 weeks and I\m almost done, I just hvae to hide from pokemon my device is rooted and this is the only way it seems to work. Any help thnx!
Anyway to download directly from phone? I tried twrp but I have rooted my galaxy s5 and it used SafeStrap recovery which has a twrp and when I try to install it won’t let me. I am confused on the fastboot and abd, since I want to try this step. Please help magisk hide is the last step I need to hide my device is rooted from pokemon, Please help!