Bluestacks is one of the most popular Android emulators right now. It has been downloaded over 370 million times as of yet. But a lot of users are facing various issues ruining this emulator. So, do you want to know how to make Bluestacks run better?
If you can’t run Bluestacks on your PC smoothly, this is the post for you. In this post, we will be sharing multiple tips on how you can run Bluestacks on your PC faster and smoother without any freezing or lagging issues.
So, let’s jump right in…
Tips to Make Bluestacks Run Better:
Unfortunately, there is not a tried and tested method that will magically make Bluestacks run better. However, we have a myriad of tips for you on this topic. And, all these tips are gathered from our experience using the Bluestacks emulator. Now, you can try all of them one by one.
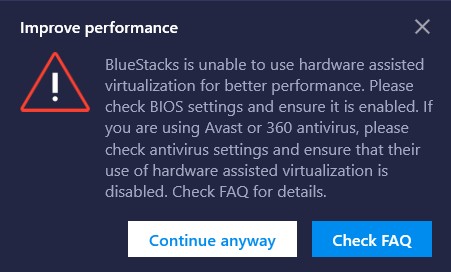
As you might have already guessed that due to the variations on the specs of your PC, some of these methods might work while others might not. So, we cannot tell you for sure, which one is going to work for you. But we can assure you that at least one of these tips will definitely work. So, let’s go.
Tip #1 Your PC vs. System Requirements:
Every program comes with a system requirement. If your PC doesn’t meet the minimum requirements, you will not be able to run Bluestacks properly on your system. And, if you want the best performance out of Bluestacks, then you will have to have a PC with at least recommended system requirements.
Minimum System Requirements Bluestacks:
- Operating System: Windows 7 & higher
- RAM: At least 2 GB
- CPU/Processor: AMD or Intel
- Disk Space/HDD: At least 5 GB free space
- Updated GPU drivers
Recommended System Requirements Bluestacks:
- Operating System: Windows 10
- RAM: At least 8 GB or higher
- CPU/Processor: AMD or Intel Multi-Core processors
- Disk Space/HDD: At least 5 GB free space; High-speed SSDs are recommended
- Dedicated GPU and Updated GPU drivers
Tip #2 Modifying the Registry Editor:
This tip is about allocating more RAM to Bluestacks via editing the registry. Let’s learn how to do that.
- Press the ‘Win + R’ key combination on your keyboard. It will bring out the ‘Run’ box
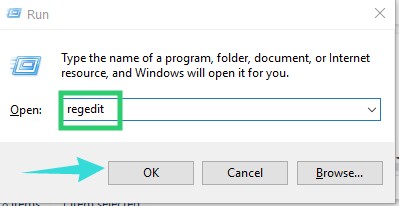
- Now, type ‘regedit’ (without the quotes) on the ‘Run’ box and click on the ‘OK’ button
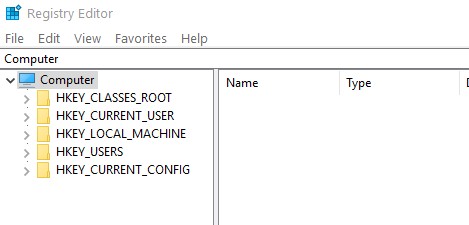
- In doing so, the ‘Registry Editor’ window will appear
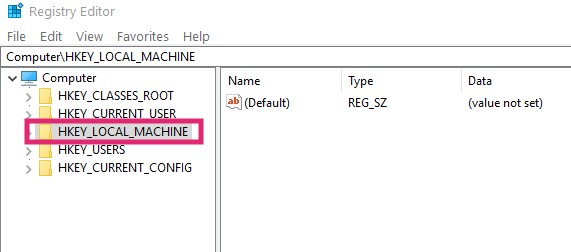
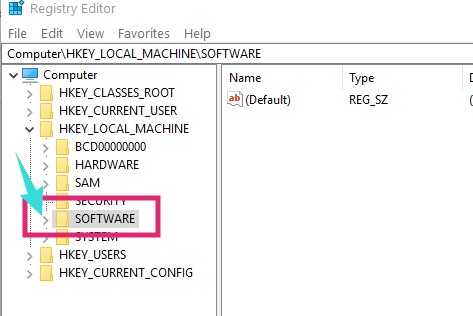
- Now, click on the small arrow next to the ‘HKEY_LOCAL_MACHINE’ option from the left sidebar
- Then click on the small arrow next to the ‘Software’ option
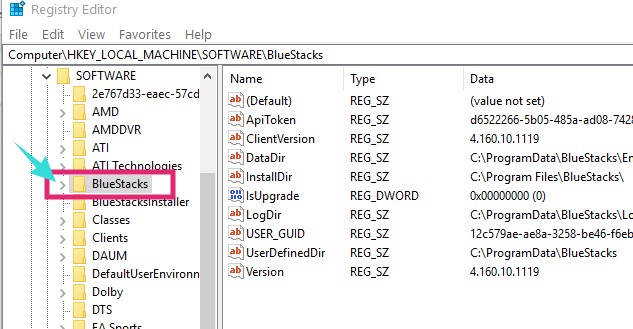
- Next, scroll down a bit and click on the small arrow next to the ‘BlueStacks’ option
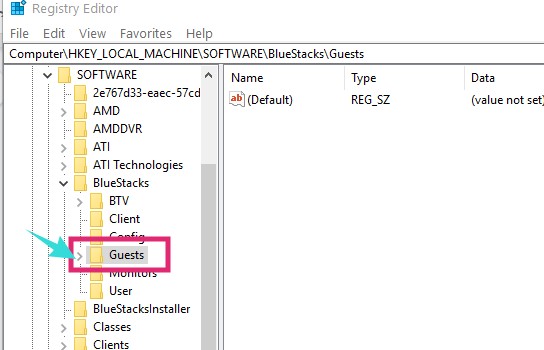
- After that, click on the small arrow next to the ‘Guests’ option
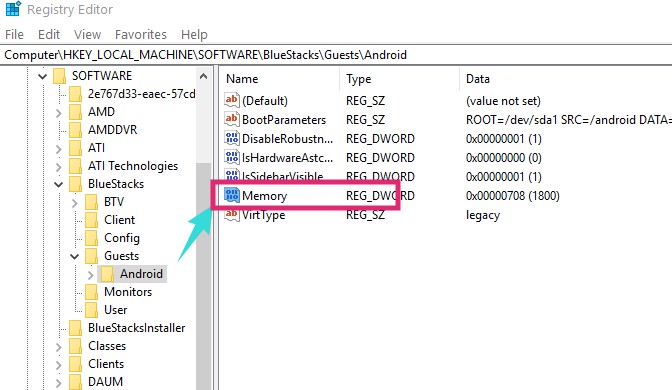
- Now, click on the small arrow next to the ‘Android’ option
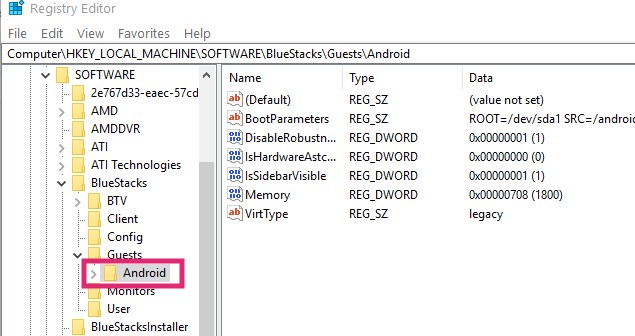
- At this point, double click on the ‘Memory’ option from the right side of the window to edit this option
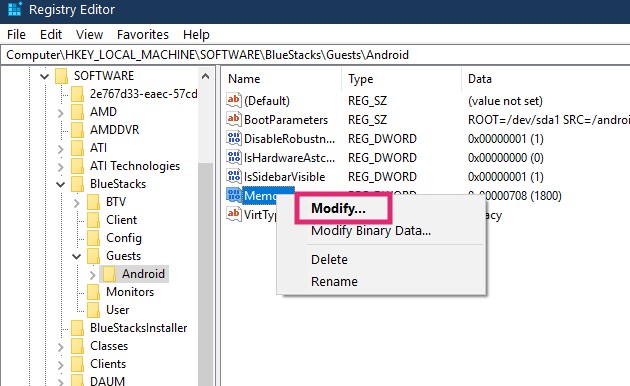
- However, you can also right-click on the ‘Memory’ option, and then click on the ‘Modify’ button from the submenu
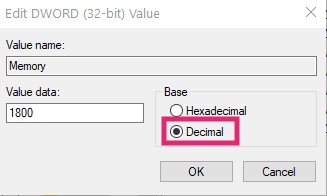
- That way, a new mini popup window will appear. Here, select the ‘Decimal’ option so that you can enter the RAM allocation size in MB
- So, enter the preferred amount under the ‘Value Data’ For instance, we wanted to allocate 2 GB = 2048 MB of RAM to Bluestacks, so we type in 2048 on the box
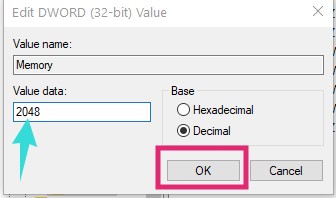
- Finally, click on the ‘OK’ button from the popup window for saving the changes
Tip #3 Close Background Programs:
If your PC is running on low resources, you might need to close all the other programs running in the background to run Bluestacks better. You can simply close all the unnecessary programs and free up some RAM. However, you can also use the ‘Task Manager’ to force-close those programs. Here’s how…
- Access the ‘Task Manager’ by pressing the ‘CTRL+SHIFT+ESC’ shortcut on your keyboard
- Then right-click on any of the programs you want to close. Then click on the ‘End Task’ option from the submenu
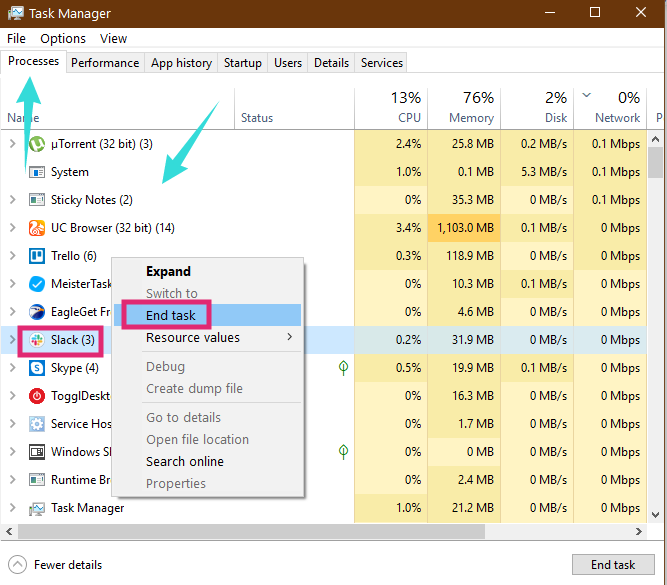
- That way, you can end all the unnecessary background programs one by one
Tip #4 Prioritize Bluestacks on Windows Task Manager
Let’s see how to prioritize Bluestacks on your PC using the ‘Task Manager’.
- Open the ‘Task Manager’ by pressing the ‘CTRL+SHIFT+ESC’ shortcut on your keyboard
- Now, click on the ‘Details’ tab from the top menu bar
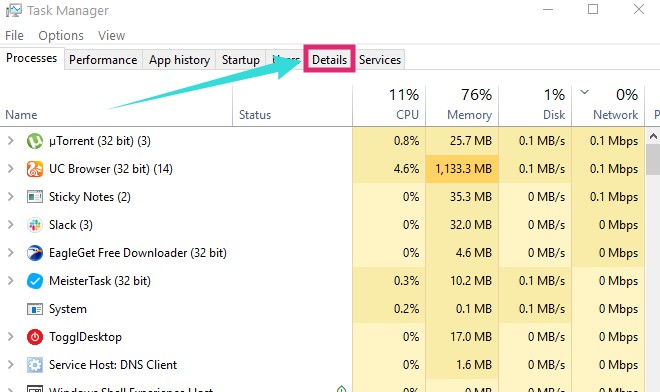
- Next, find the ‘Bluestacks.exe’ You might see that multiple instances are running at once
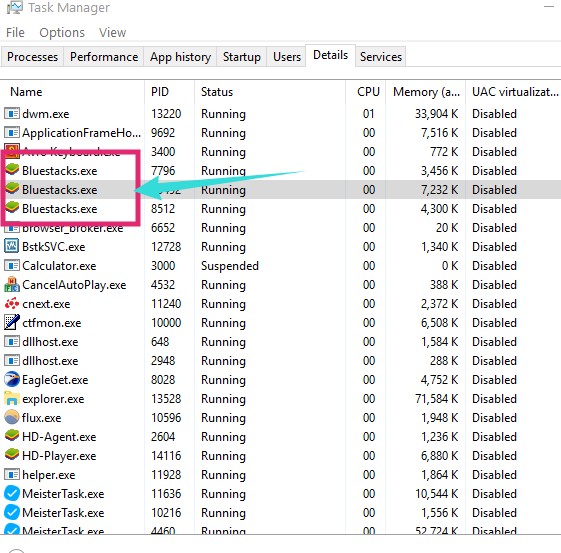
- Now, right-click on the ‘Bluestacks.exe’ from there and then hover your mouse cursor over the ‘Set priority’ and select ‘High’ from the new pop up menu
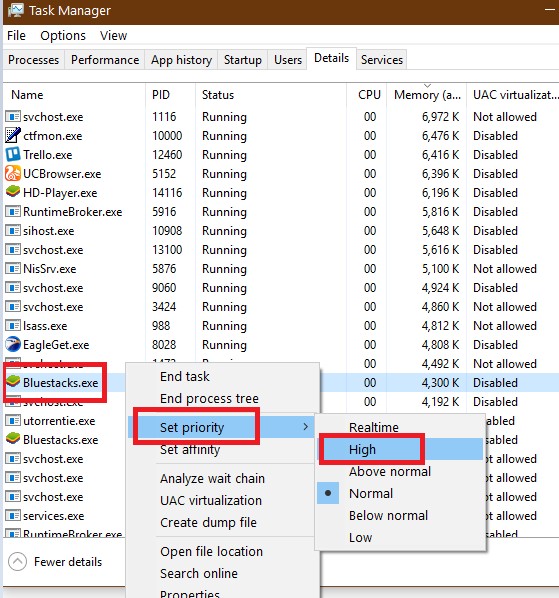
Tip #5 Allocate More RAM to Bluestacks:
If you are using the latest version of Bluestacks. Then there is an option to allocate more RAM from inside the program. Let’s see how…
- Launch ‘Bluestacks’ on your PC
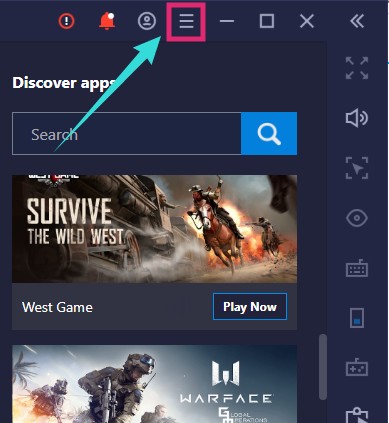
- Now, go to Settings option by click on the ‘Hamburger’ menu from the top right corner
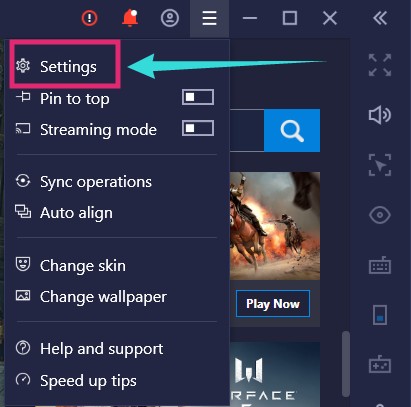
- Then click on the ‘Settings’ option from the new options
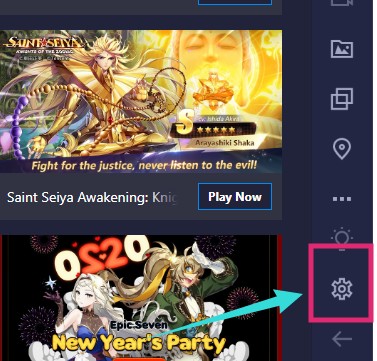
- Or else, you can simply click on the ‘Settings/Gear’ icon from the bottom right corner of the right sidebar
- Now, click on the ‘Engine’ option from the left sidebar of the ‘Settings’ window
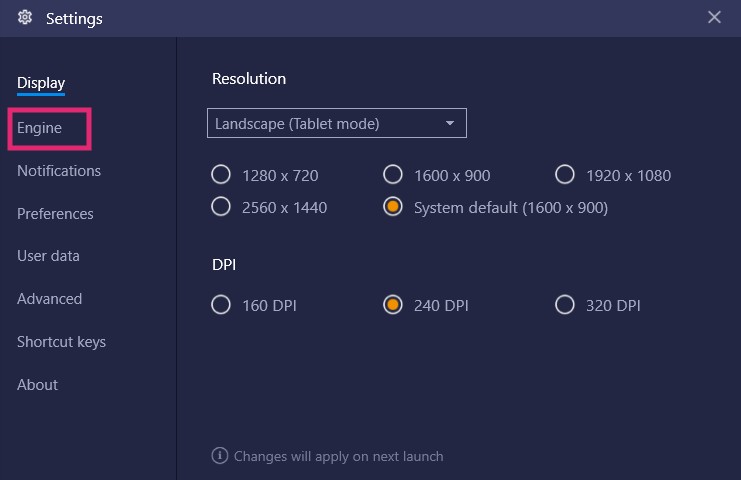
- In doing so, you will find a lot of options on the right side of the screen
- So, scroll down a bit till you find the ‘Memory’ Now, increase the allocated RAM by sliding the slider to the right side
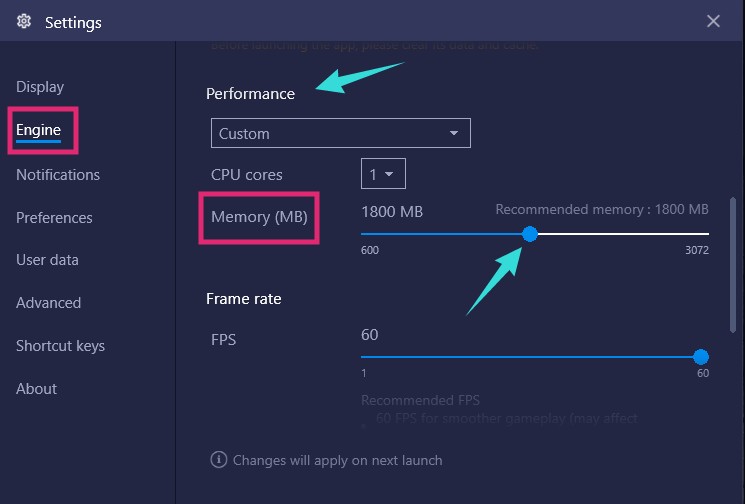
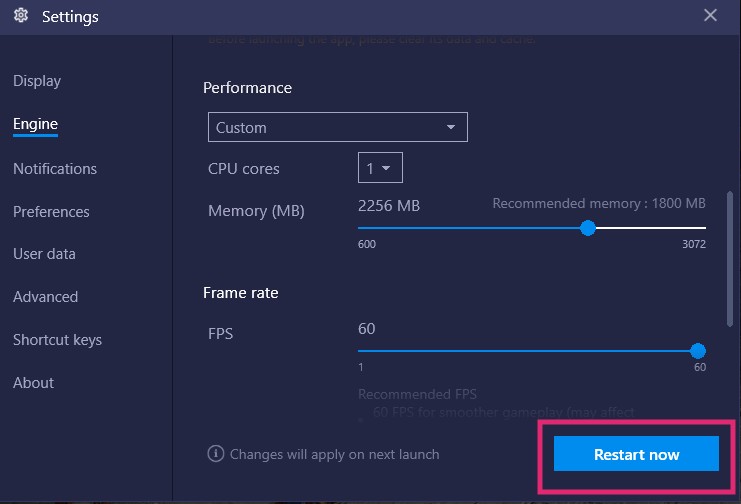
- You should always keep at least equal to the ‘Recommended Memory’ The higher the better. However, don’t allocate all the RAMs to Bluestacks. Now, click on the ‘Restart now’ option to save all the settings
Tip #6 Enable Virtualization
If your CPU supports virtualization, then enabling virtualization will be a great help to run Bluestacks better. However, enabling virtualization is not that easy. You have to do it from the BIOS settings. Thus, we are sharing the video from the official YouTube channel of Bluestacks on this topic. You can follow those instructions.
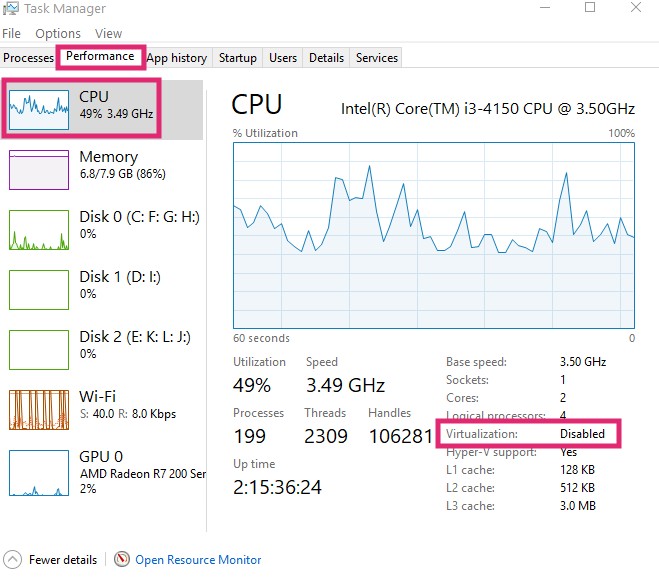
Also, you can check whether the ‘Virtualization’ is enabled or not on your PC. Here’s how to do that.
- Open the ‘Task Manager’ by pressing the ‘CTRL+SHIFT+ESC’ shortcut on your keyboard
- Now, click on the ‘Performance’ option from the top menu bar. Then click on the ‘CPU’ Now, you will see the state of the ‘Virtualization’ option on the bottom right corner of the screen. In our case, it is disabled. If it is the same for you as well, you can enable it following the video above
Tip #7 Modify the Display Settings on Bluestacks:
Another way to optimize Bluestacks is to modify the display settings. This is how…
- Launch the ‘Bluestacks emulator’ on the PC
- Then go to the ‘Settings’ menu like we already instructed in the Tip #5
- Next, click on the ‘Display’ option from the left sidebar. And, change the ‘Resolution’ and the ‘DPI’ settings to a lower value
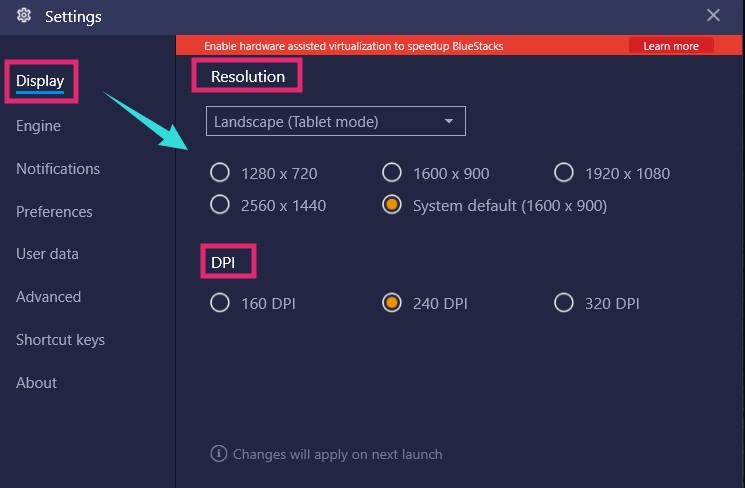
- Finally, click on the ‘Restart now’ button to save the new settings
Tip #8 Increase the Windows Virtual Memory Size:
Here is the step by step method down below.
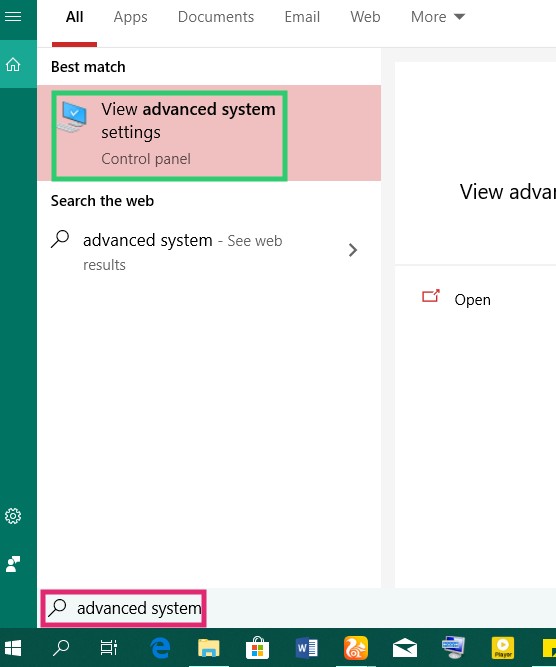
- Search for the ‘View advanced system settings’ in the Windows search box and open the settings
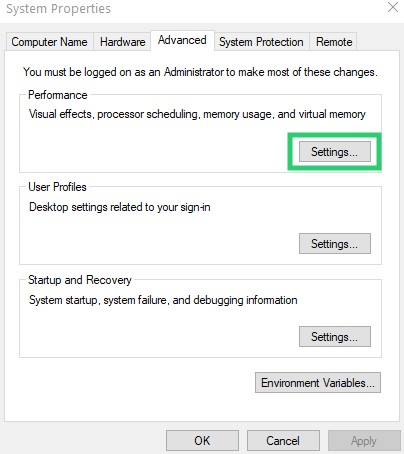
- Now, the ‘System Properties’ window will appear. Click on the ‘Settings’ option from there
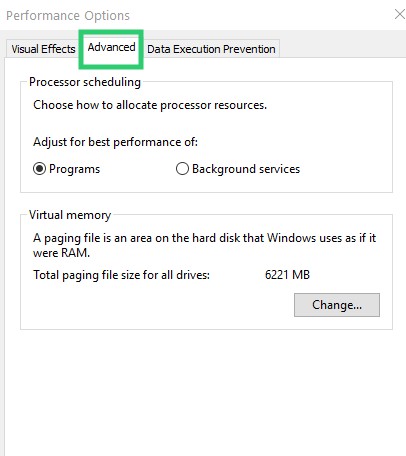
- Next, head over to the ‘Advanced’ tab
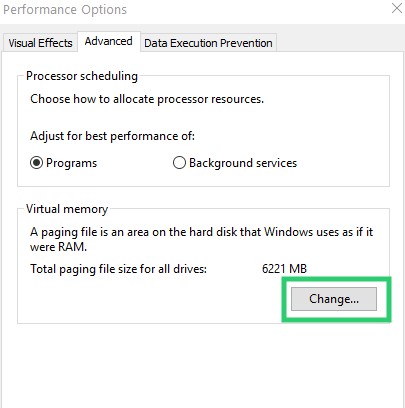
- And, click on the ‘Change…’ button from under the ‘Virtual memory’ option
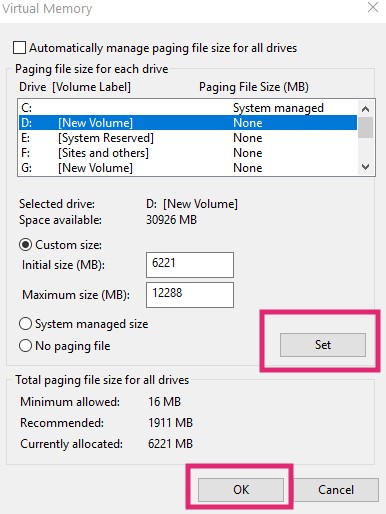
- Now, uncheck the ‘Automatically…paging file…all drives’ first
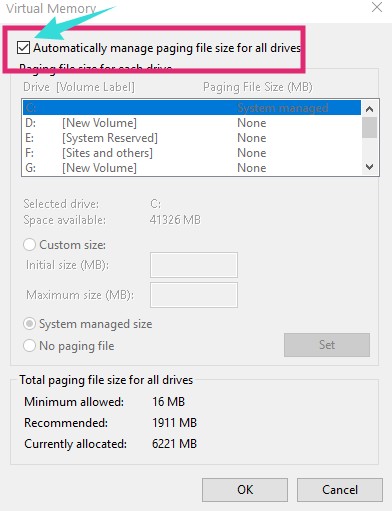
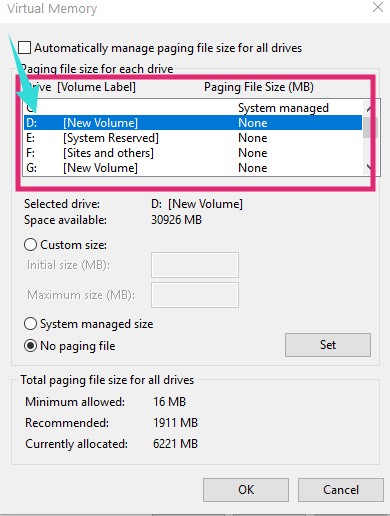
- Next, select any of the disk drives which has a large amount of space available. For example, we have selected the ‘New Volume D’ drive in our case
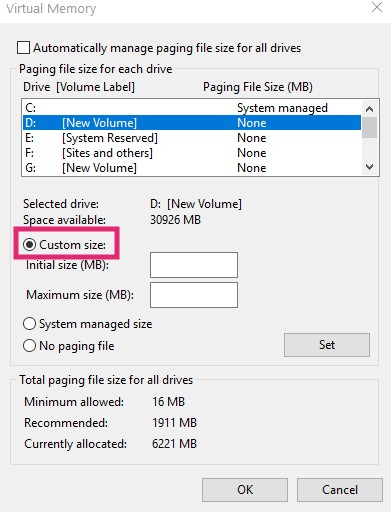
- Now, click on the ‘Custom Size’ option
- Right now, you have to enter the Paging size you want to allocate. First, on the ‘Initial size’ box, you have to enter the ‘Currently allocated’ You will find it at the bottom of this window. In our case, it was ‘6221’, you have to enter according to your value. And, the maximum size would be 1.5 times of your RAM. For instance, we have 8 GB of RAM, so we would enter 8x1024x1.5= 12288 MB. However, in your case, it might not be the same if you don’t have 8 GB of RAM. So, calculate this on your own using the formula above. Also, try to make sure that the page size is higher than the recommended amount
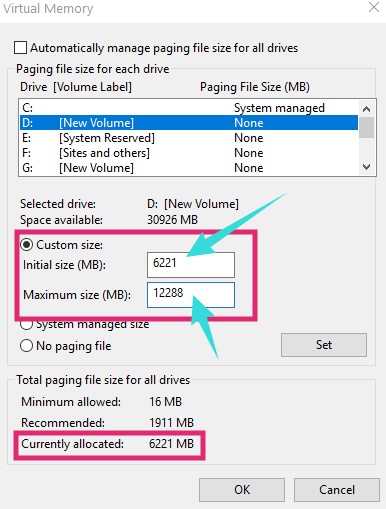
- Finally, click on the ‘Set’ and ‘OK’ button to finalize the settings
Tip #9 Select a New Power Plan:
If you are using a laptop, you can try to modify the power plan. This can solve the issue of Bluestacks running so slow. Here’s how…
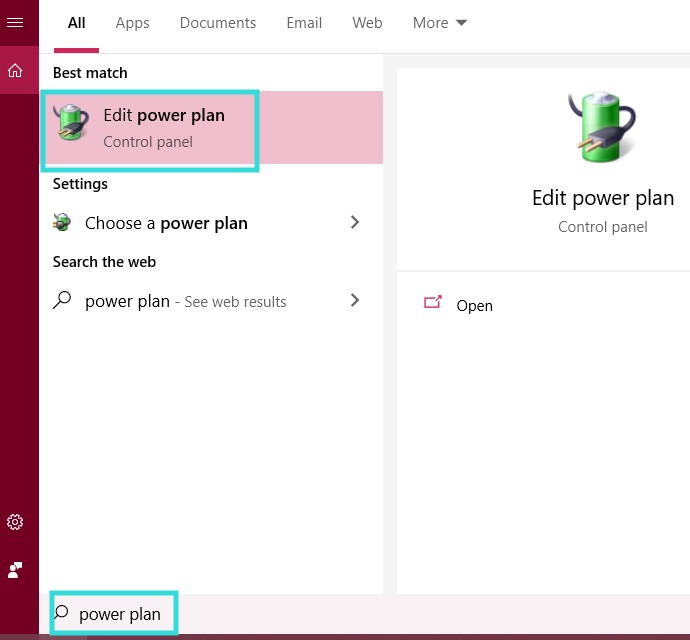
- Search for ‘Power plan’ on the Windows search box and click on the ‘Edit power plan’ option from the search results
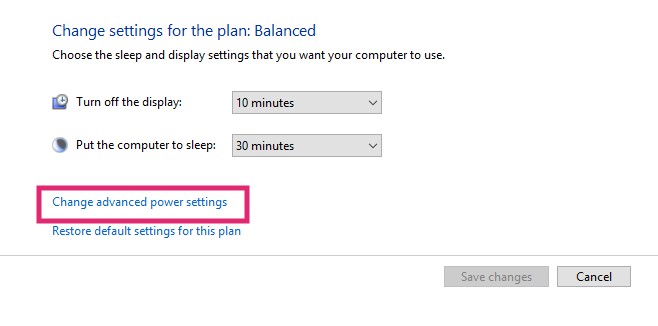
- Now, click on the ‘Change advanced power settings’ option from the next page
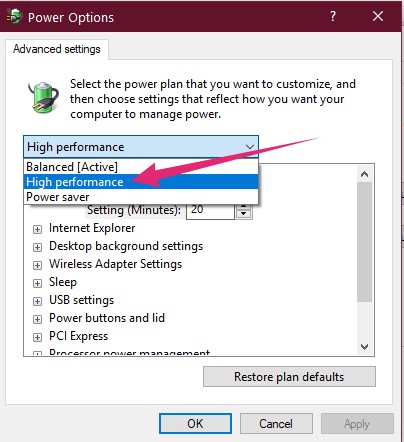
- It will bring out the ‘Power Options’ window
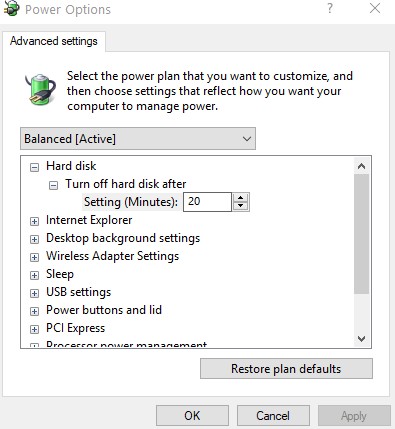
- Now, click on the dropdown menu and select the ‘High performance’ option from there
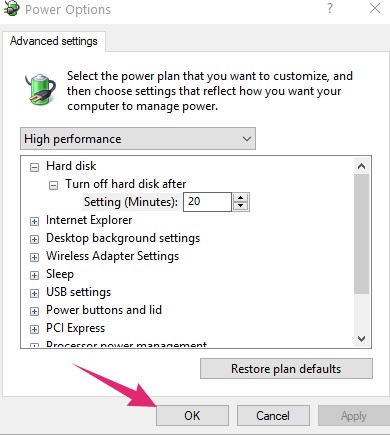
- Finally, click on the ‘OK’ button to save the new settings
Tip #10 Customize the Visual Effects Options:
You can also try to customize the ‘Visual Effects’ options from the Windows settings. Let’s see how…
- Search for the ‘View advanced system settings’ in the Windows search box and open that settings from the search results
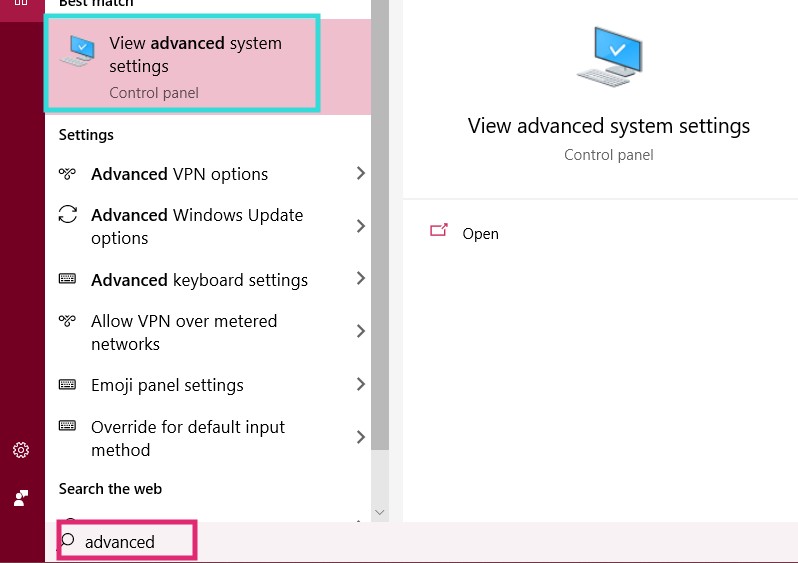
- Now, the ‘System Properties’ window will appear. Click on the ‘Settings’ option from there

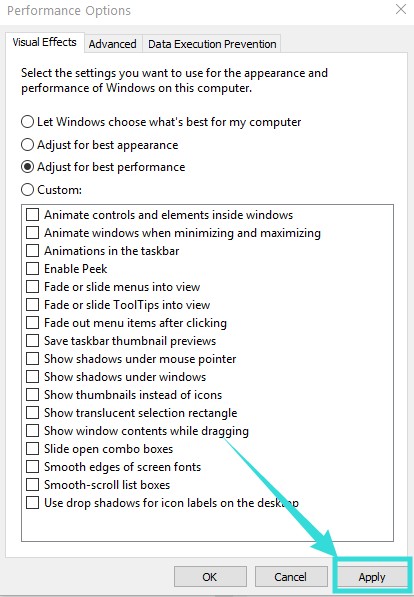
- Next, click on the ‘Adjust for best performance’ option from under the ‘Visual Effects’ tab
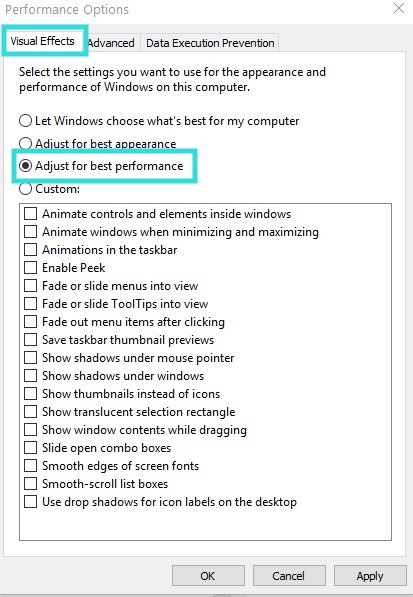
- Finally, click on the ‘Apply’ button from the bottom right corner to save the settings
Tip #11 Clean Temp Folder Files:
Windows automatically saves a lot of temporary files on a hidden folder. You can delete them for better Bluestacks performance.
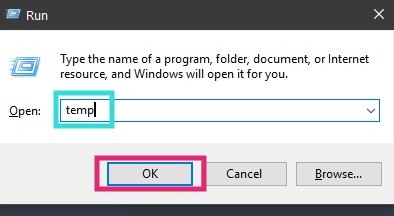
- Press the ‘Windows + R’ keys on your keyboard to bring the ‘Run’ box
- Now, type the word ‘temp’ on the box and click on the ‘OK’ button
- Next, the temp folder will open. However, it might show a warning message. Simply, click on the ‘Continue’ button and you will be on your way
- Now, select all the files and folders on that folder, then right-click and click on the ‘Delete’ button
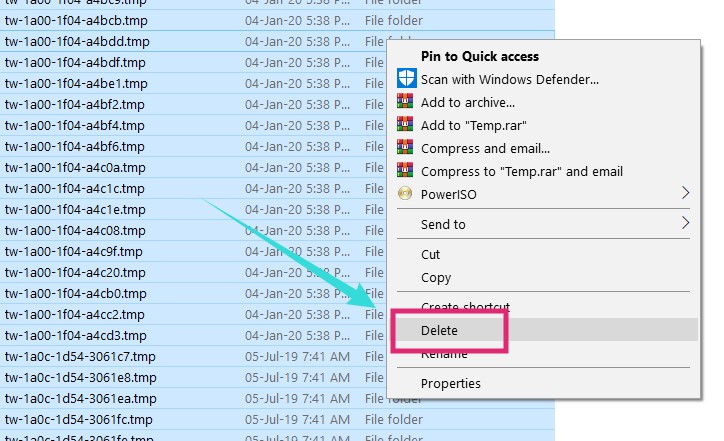
- In this way, it will be moved to the ‘Recycle bin’ You can delete them from that folder later. Also, you can press the ‘Shift + Delete/Del’ keys on your keyboard to delete them permanently
Tip #12 Update to the Latest Bluestacks Version:
If you have been using an older version of Bluestacks till now. It is time to update to the latest version. The latest version of any software comes with lots of optimization. So, if you want to run Bluestacks better update it to the latest version. Or you can download the latest version of Bluestacks from the official site and then install it.

Tip #13 Update the Graphics driver:
Another reason for Bluestacks freezing or crashing would be the outdated graphics drivers. Thus, you should always update to the latest version of the GPU driver on your PC. Here are some important links to get the latest Graphics drivers.
Tip #14 Turn Off Anti-Virus:
We have also found some reports saying that the Anti-Virus software might be interfering with Bluestacks. As a result, the Bluestacks emulator faces issues like lagging, freezing, or crashing. In order to fix this, you can temporarily disable or permanently uninstall the Anti-Virus software from your PC.
Tip #15 Your PC Configuration & Rollback Bluestacks Version:
If you have tried all the above fixes and still, you are facing issues with running Bluestacks smoothly on your PC. It might be the specifications of your PC. So, check the system requirements of Bluestacks and see if your PC meets all those requirements.
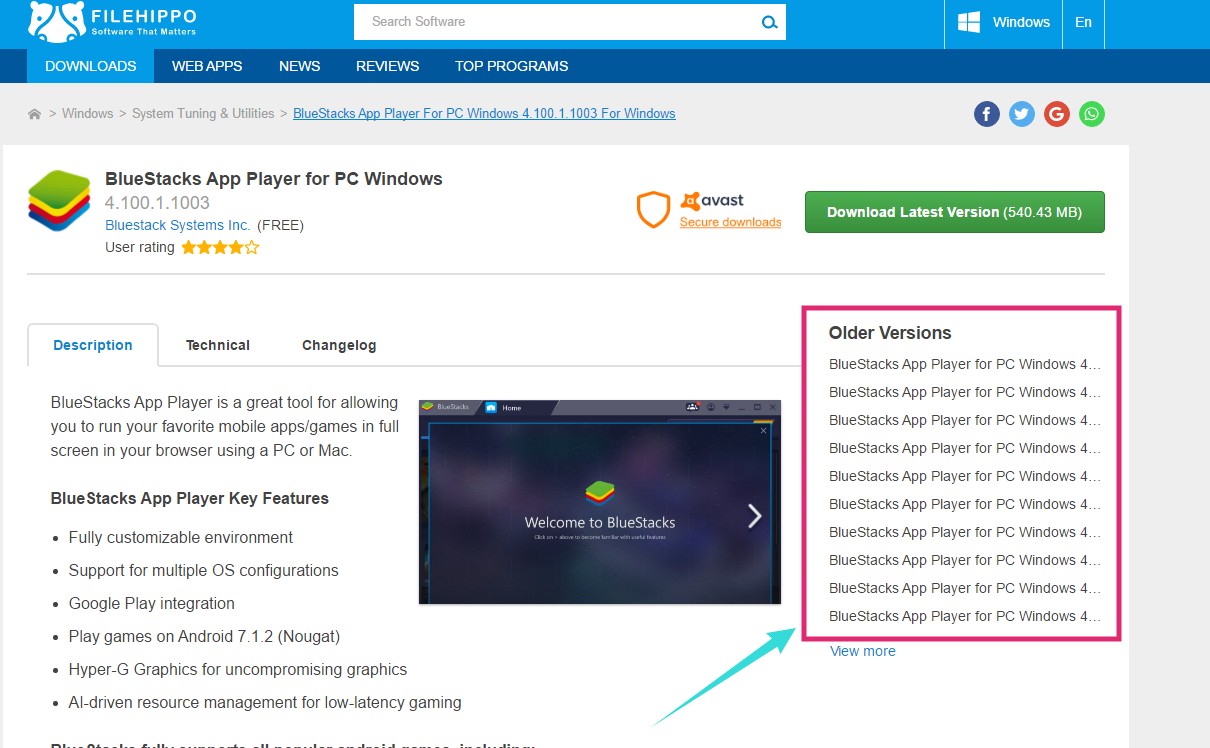
Also, if you are using a low-end PC in terms of hardware, you can try to install any of the previous versions of Bluestacks. There are reports that some older version of Bluestacks run better on old or PCs with low-end configuration.
Wrap Up – How To Make Bluestacks Run Better:
So, we have shared multiple tips to make Bluestacks run better on your PC in this post. All of these methods are very easy to implement. And, we have tried most of them and saw a huge improvement in running Bluestacks on our system.
Yes, you don’t need to try all of these methods. We have shared all these variations as we don’t know the exact PC configuration or PC settings of all of our readers. You can try them one by one and see what works best. And, we hope these tips will help you to run Bluestacks on your PC faster, better, and smoother.
So, do you use Bluestacks frequently? You can share your experience with us in the comment section down below!