If you have a Motorola Moto X, you might be searching for how to root Moto X. If you want to bring the best out of your Android phone, you will need to root it. But we can tell you that rooting any phone is not an easy task.
You should be very careful when rooting a phone. Because one wrong step can damage your phone permanently. But no need to be worried at all. Because, in this post, we will be explaining how to root the Motorola Moto X in a step by step manner. So that it becomes very easy to grasp for our readers.
Thus, let’s get started without wasting more words…
Disclaimer: Rooting any phones will void its warranty. Plus, in the process of rooting your Motorola Moto X, you might permanently damage or brick your phone. So, try to follow the instructions as carefully as possible. And, depending on the model of your Moto X, this procedure might not work for you. Lastly, Savegyd is not responsible if you damage your phone or void the warranty in the process of rooting your Android smartphone.
How To Root Moto X by Motorola:
In this section, we will be explaining the entire procedure of rooting the Motorola Moto X in part by part. Here are the things you will need to start the procedure.

Before You Begin:
- Backup all the files on your Moto X
- Make sure your device has over 70% battery level
- A PC
Part #1 Download and Install Motorola Moto X USB Driver:
First and foremost, you will need to download the USB driver for your Motorola Moto X. You can download the files from here. There will be 3 versions of the Motorola USB drivers. If you have macOS, then click on the ‘Mac’ link from there.
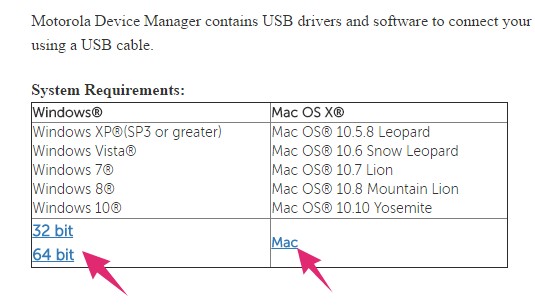
For Windows OS users, there are 2 versions. Depending on your OS, you can download either the ‘32 bit’ or the ‘64 bit’ version. After you have downloaded the file, you should install it on your PC.
Part #2 Enable the USB Debugging Mode on Your Moto X:
At the moment, you will have to enable the USB debugging mode on your Motorola Moto X if you have not already. It is very easy to do. Simply, follow the instructions below…
- Navigate to the ‘Settings’ menu on your Moto X
- Next, tap on the ‘About’ option from there
- Right now, you have to tap on the ‘Build Number’ option 7 times on a quick succession
- In doing so, there will be a popup notification on the screen saying that ‘You are a developer now’ or something like this. That means, you can now enable the USB Debugging option and there will be a new option named ‘Developer Options’
- So, tap and toggle on the ‘Developer Options’ from there
- You might see a prompt saying ‘Allow Development Settings?’ Simply, tap on the ‘OK’ button to close it
- Now, scroll down and navigate to the ‘Debugging’ section and tap on the ‘USB Debugging’ option to enable it
- Finally, if there is a prompt saying, ‘Allow USB Debugging?’, then tap on the ‘OK’ button to confirm it
Part #3 Unlock the Bootloader of Moto X:
So, you have downloaded and installed the Motorola USB drivers on your PC. Later, you have also enabled the ‘USB Debugging’ option on your smartphone. At this moment, you will have to unlock the bootloader of Moto X. Bear in mind, there are some models that don’t support the bootloader unlock the program.

You can find a list of the Motorola devices that support unlocking the bootloader here. If you don’t find your device on that list, you can follow the instructions on rooting a Moto X with a locked bootloader from here. We don’t recommend it though, as it would be a risky process for your phone. As a result, we will be only sharing the process for rooting a Moto X with an unlocked bootloader.
Now, how do you unlock the bootloader of your Moto X? There are a few methods you can try for this. However, Motorola has published a well-documented guide on this topic. So, we will recommend you to follow the official guide of Motorola on unlocking the bootloader of Moto X. You can find the guide here.
Related: How to shut down Windows server 2012
Part #4 Root Moto X with an Unlocked Bootloader:
If you have followed the guide on unlocking the bootloader of Moto X above, now you have an unlocked bootloader on your Moto X. So, it is time to root your Motorola Moto X finally. But before you jump off, let’s see what you are going to need first.
Things You Will Require:
- Android SDK and install it on your PC
- The latest version of TWRP Recovery
- SuperSU for rooting
- Install Motorola USB driver on your PC if you haven’t already
- CWM Recovery according to your Moto X Model
- MFastboot

Steps to Follow To Root Motorola Moto X:
- First of all, you will need to install the Android SDK on your PC
- Then copy the MFastboot files and paste those on the folder where the ADB is located
- Next, transfer the SuperSU ZIP file to your Motorola Moto X’s internal storage

- Now, you can enter the bootloader mode. To do that, power off the phone. And power it on again by pressing and holding the ‘Power’ and ‘Volume +’ button at the same time
- In doing so, you will be on the bootloader. Now, connect the phone to your PC via USB cable. Tips: in the bootloader, you can navigate by pressing the ‘Volume Down’ button and select any option by pressing the ‘Volume Up’ button on the Moto X
- Now, open the command prompt on your PC. On the CMD, paste the directory where you have put the ‘MFastboot’ In our case, it was ‘CD C:\Program Files\User\Moto X Toolkit’. You can paste the code we have just shared but you have to change the directory according to your PC and hit the ‘Enter’ key
- In this instance, you will need to boot the phone into recovery mode as soon as possible
- To boot into the recovery mode, you will have to use the ‘Volume Down’ button to highlight the ‘Recovery Mode’ After you have highlighted the ‘Recovery mode’, you will have to press the ‘Volume Up’ button to select the recovery mode on your phone
- Now, select the ‘Install’ option from the recovery mode and locate the ‘SuperSU.zip’ file you have transferred to your phone earlier
- And, now, click on the ‘SuperSU.zip’ file and swipe to install it
- When you have successfully installed the ‘SuperSU.zip’ file, it means you have rooted your phone. So, you can reboot the Moto X and see if you have got the root access
- To check that, you can install any apps from the play store that needs a rooted device to run. So, if those apps run successfully, your Motorola Moto X is now rooted
Last Words—How To Root Moto X:
We have just shared the process of rooting the Motorola Moto X. In the process of making this tutorial, we have tried to make sure that it is easy to understand and follow. However, we have to admit that rooting a phone is not that easy and straightforward.
There are a lot of steps involved in the process. And all of the steps are also very tricky. Thus, our primary goal was to present the guides as simple as possible. And, we hope this post will help you if you are in need of rooting your Motorola Moto X smartphone.
So, have you rooted any Android phone prior to this? Which phone was that? You can tell us all about that in the comment section. Also, if you are facing any issues following this post, you can leave your comments there as well.